Background
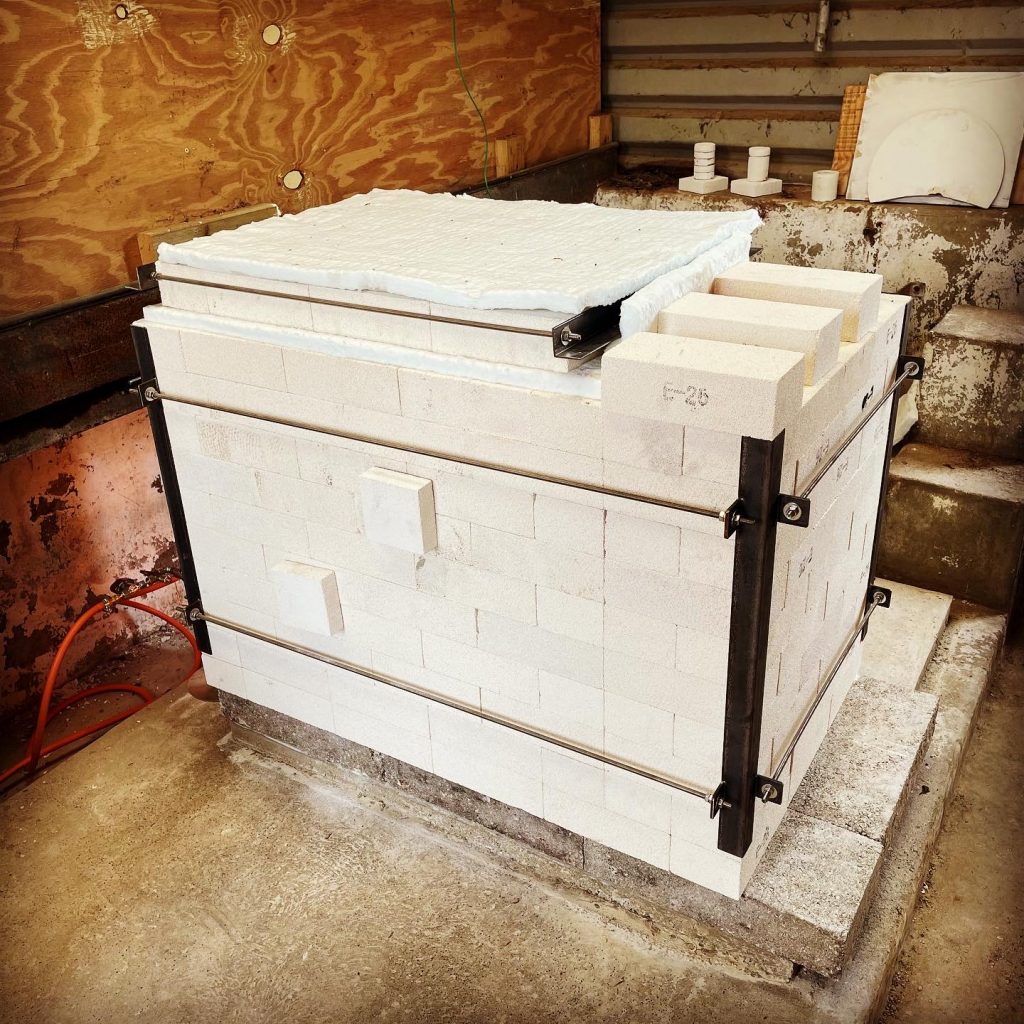
Years ago I purchased an old raku kiln, pyro, thermocouple and burner. The kiln was falling apart, but the carcass was good enough to reuse. I rebuilt it as a downdraught gas kiln by simply buying new bricks and building an internal flue. Apart from modifying the flue (which was initially too small), and replacing the ceiling bricks a few times I have fired it over a hundred times, mostly to 1250-1280 and mostly in reduction. This has taught me so much, to the point where I’ve been confidently firing on timing and cones alone and having some great results along the way.
The kiln has been great but it’s small, whilst this is good in itself (as you fire it lots and learn more), it’s so restrictive on space that I rarely make larger pieces, even one slightly awkward piece can mess up the shelf configuration and mean the stack is difficult to manage. It’s also so small that heating it up slowly is a real challenge, I could never do a bisque firing in it, and bigger pieces are at risk from too rapid a heating cycle.
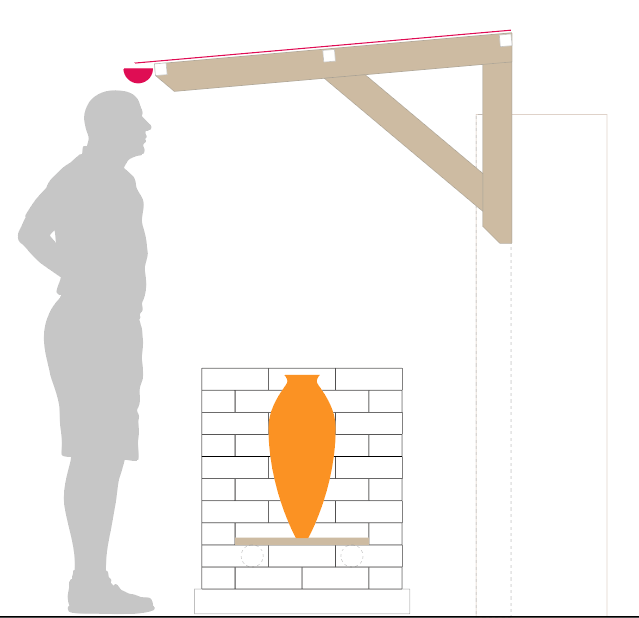
It’s time to scale up a little, and I’ve worked out plans for a kiln of around 7 cubic feet internal volume. The dimensions are set based on a standard brick size 230 x 76 x 114 and unlike my old kiln the bricks will be on the 230 x 114 face rather than on the 230 x 76 face i.e. the walls will be better insulated, but it will need more bricks to build. I also don’t want to deal with the flue on the inside of the kiln. I have positioned pieces around the flue way too many times and now realise that the awkward shape it makes of the inside of the kiln is something I now want to avoid. I also don’t want to make it so big that firings cost too much both in terms of time or in volume of gas required.
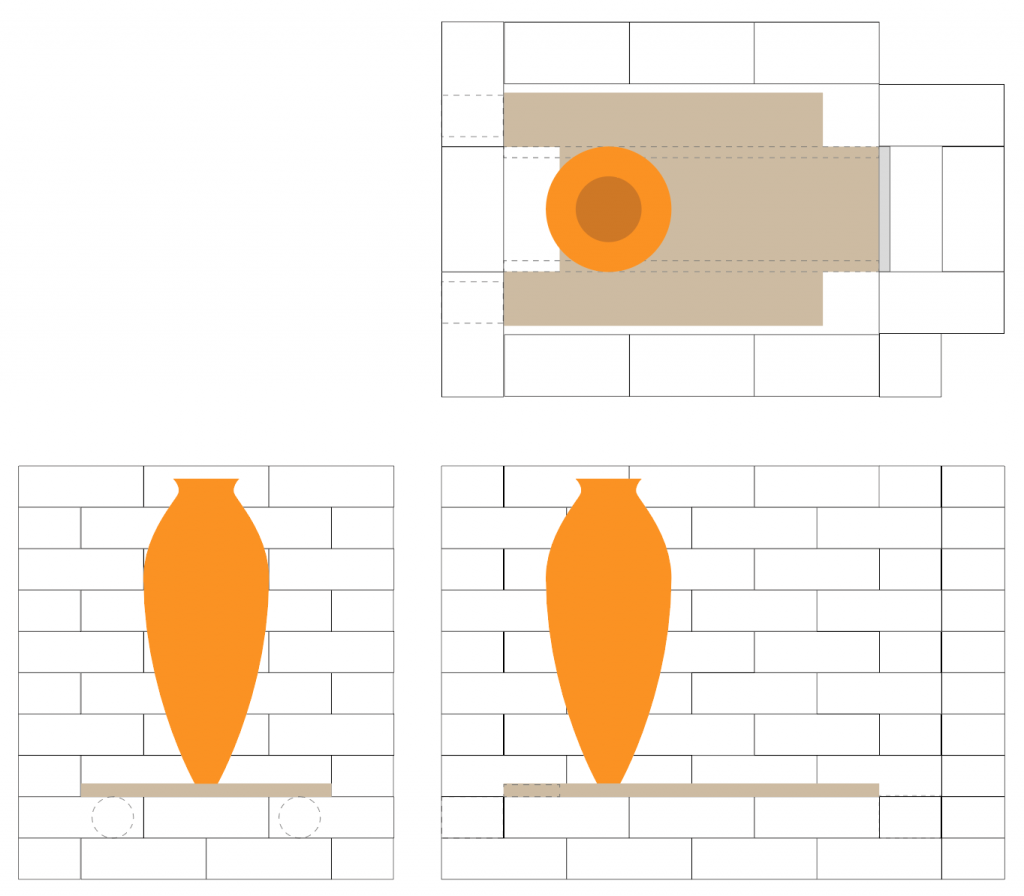
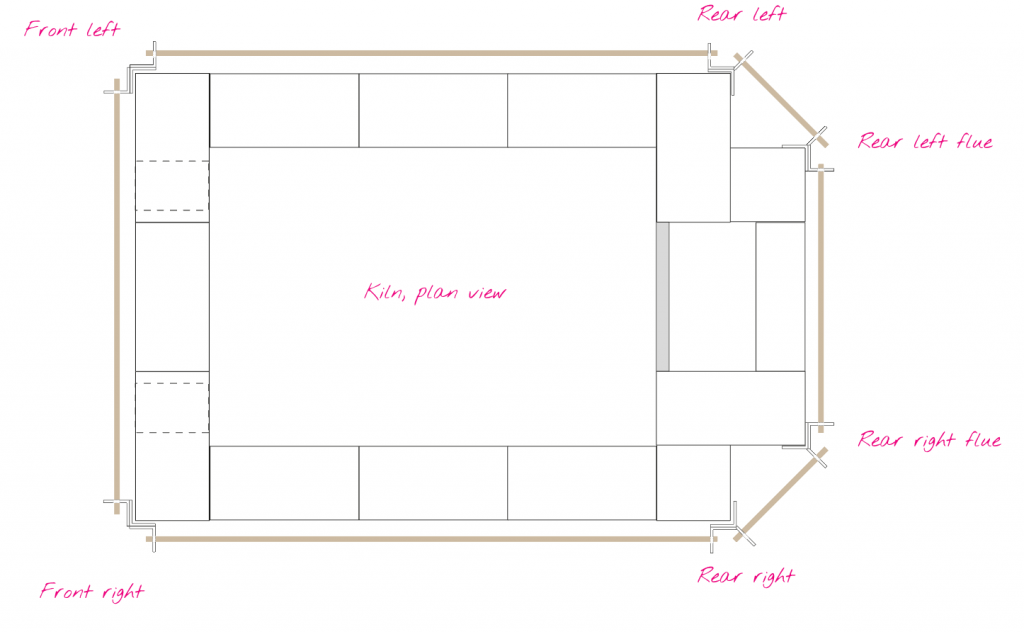
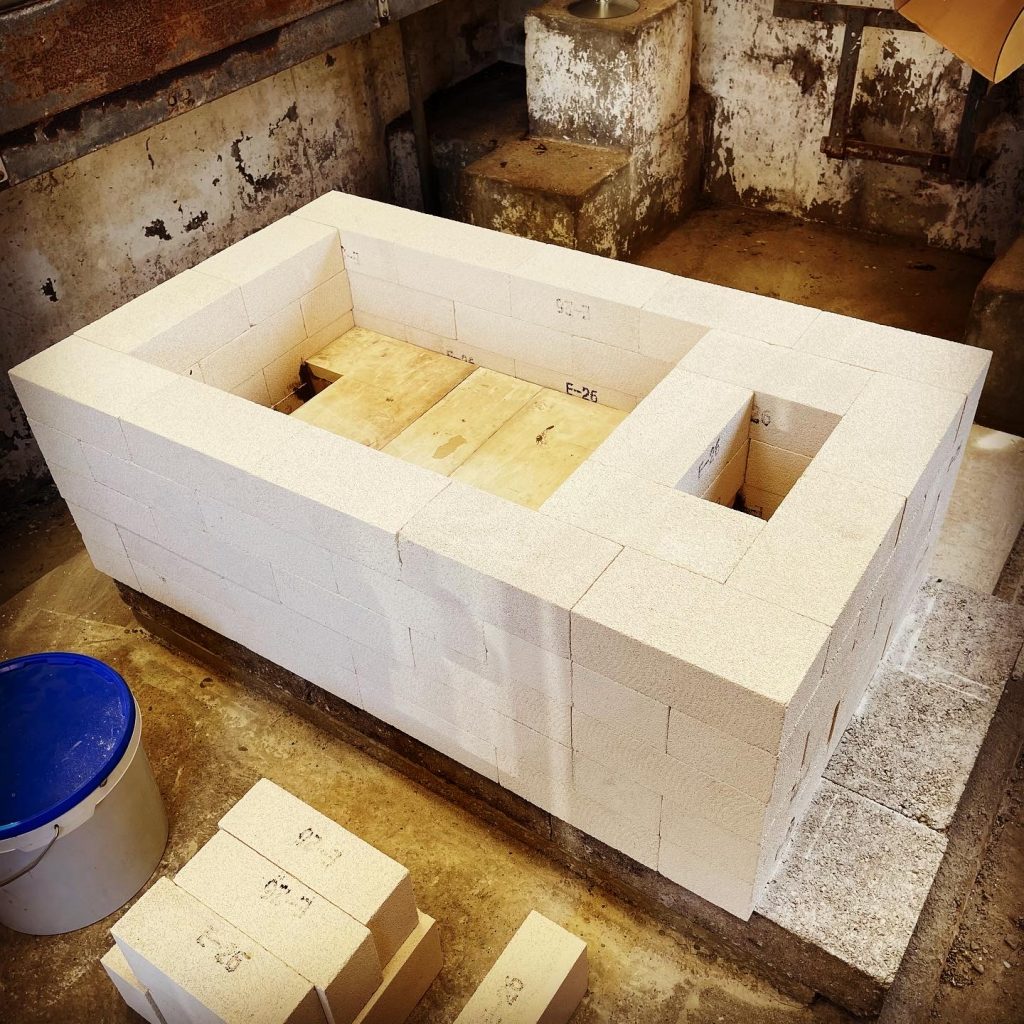
The image above was fairly early planning and using the brick dimensions of 230 x 114 x 76 you can see the size, I wasn’t sure how it would work out around the flue/chimney. Internals are 690 x 460 x 608 (-1 shelf height, maybe 25mm). This works out to be about 7 cubic feet.
Flue size
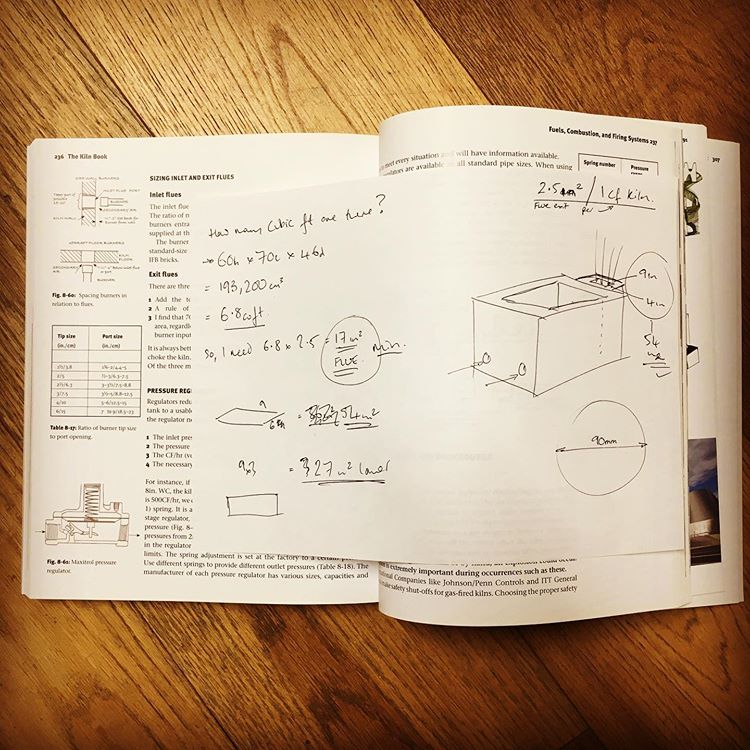
Whilst we are on the subject of calculations, flue size is one to think about. Having built the last kiln with a flue too tight and agonisingly waiting for the top temperature to be reached and falling well short at around 1060 this is one to avoid. Fred Olsens book ‘The Kiln Book’ is pretty helpful on estimations here, see my calcs below. 2.5 square inches of opening for each cubic foot. So I need about 17 square inches minimum. The way I see it is you can dampen down the opening by simply sliding a brick over the flue exit, but you cant open up a flue that’s too tight, so I’m going for around a third bigger than required at the smallest point, around 27 inches. I would have also thought restrictions like turning corners may mean a larger flue is needed so bigger the better, I don’t want to start breaking the neat crisp line of the bricks up shortly after the build is complete to figure out a wider flue!
You might be thinking by this stage, all looks good but what about the ceiling/roof? Pleased to say this could be the easiest part, I’m going to be using 610 x 230 x 76 bricks, 4 of them. Yep, that really is 610mm in length, I had no idea they made them that long. They simply span the width. I think I could have used kiln shelves and then soft bricks on top, or fibre blanket on top although I have been warned that the thermal shock can be an issue and the edges would have to be really well insulated.
Burners
From a burners perspective I have a 30kw Rhode freestanding burner, and think I need the extra power for this kiln and needed to find a matching one and fire with two. Castree Kilns do a budget 32kw burner for £150 so I went with that. It came with gas hose and guage and a flame cut out device but +VAT + Shipping worked out to £189. Ebay didn’t seem to have anything suitable and they do seem to be rare 2nd hand at the best of times so it’s just a cost I had to pay. I did think about making one but there are enough variables on this build as it is and I got my wallet out.
UPDATE: I have since found another Rhode raku burner and replaced the one in the photo below which was way too loud for my situation. The Rhode burner is way more expensive but so much better to work with.
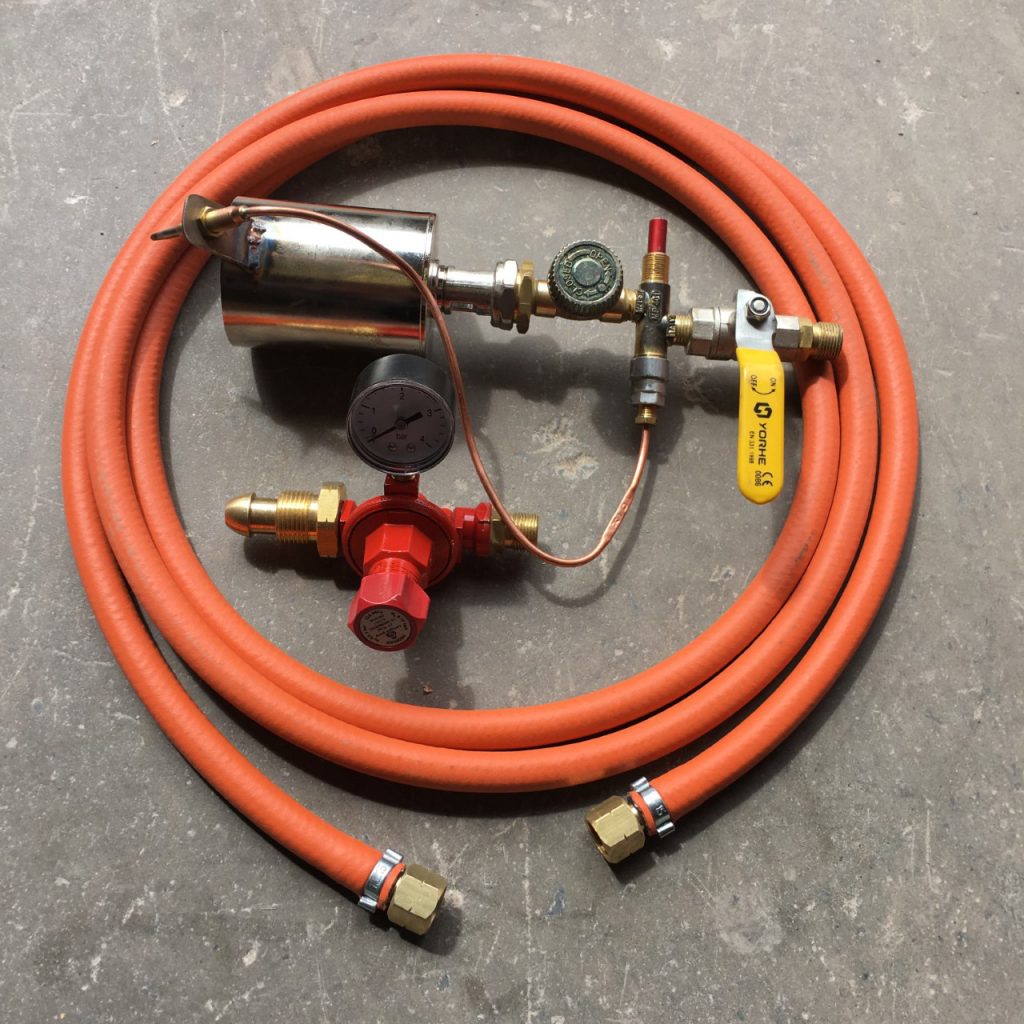
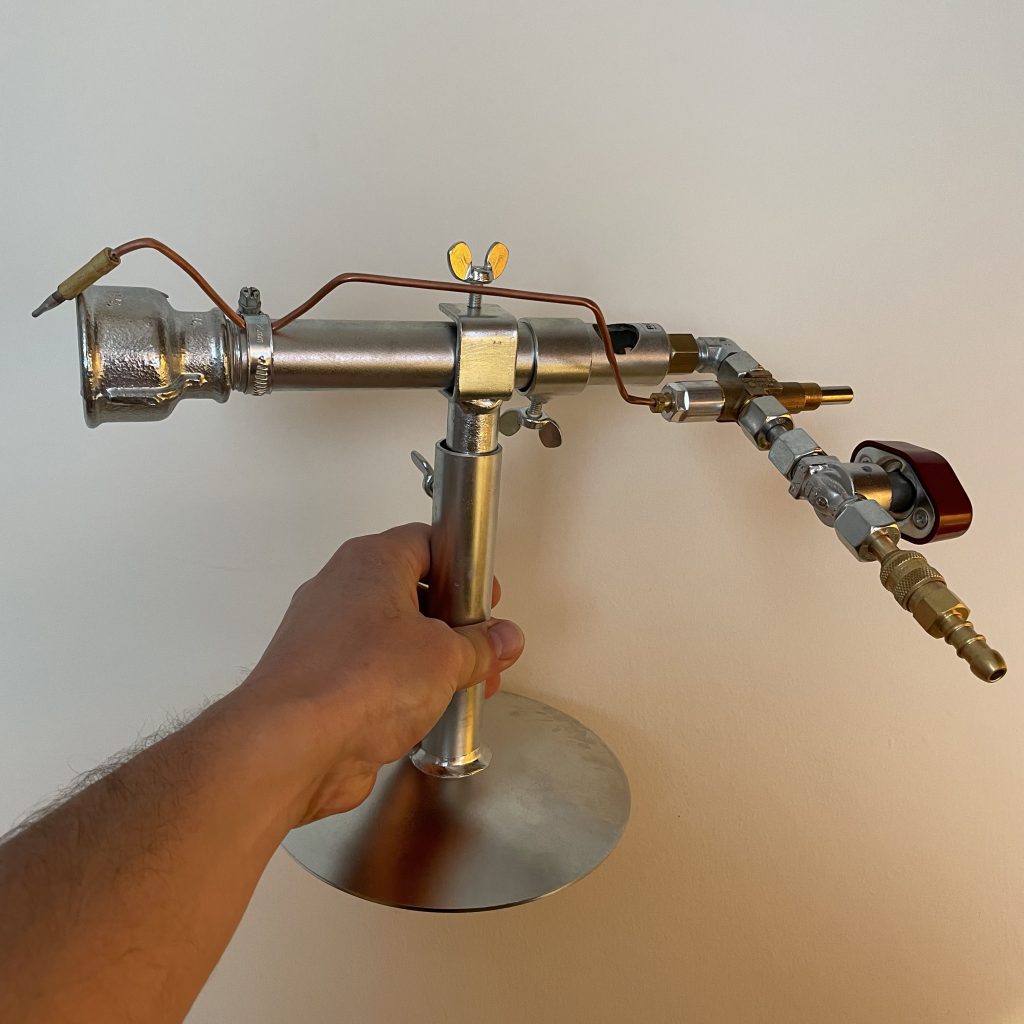
See above for the burner I swapped out to – I have 2 of these now, love them.
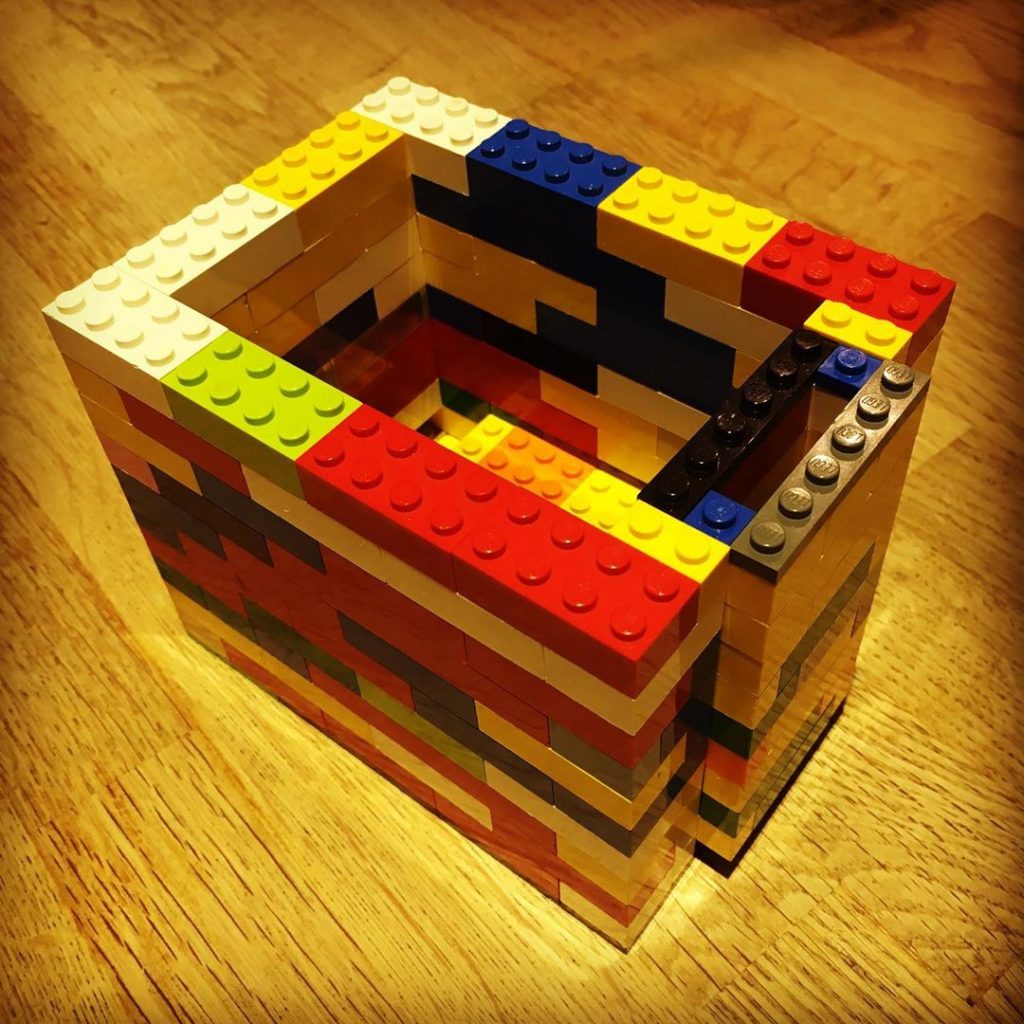
With plans in my head and the burner having arrived I calculated bricks required in part on the computer but also through Lego. What a fantastic medium for modelling a kiln build, Lego bricks are almost the right size ratio and you can get a good idea of the construction by physically building it and turning it around in your hands. So I needed 143 bricks for the build, plus the ceiling, plus any that break, any that were defective, plus some spare plus a few to repair my old kiln. That works out to be exactly 200! (Update: see right at the end, the new configuration needs a few more bricks)
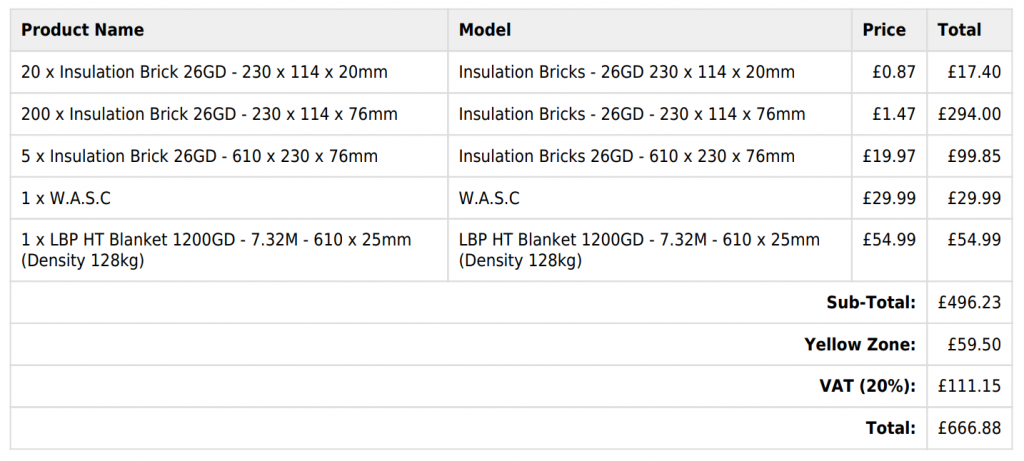
Kiln Linings were great, they had the bricks in stock – even the big ones. Minimum order £200 so thinking ahead I also got cement (for those awkward spots and future repairs), high temp blanket for extra insulation on the outside and skinny bricks for the internal wall of the flue, those were 230 x 114 x 20. I could cut them from the regular size bricks but not that thin, and my only option is a hand saw and it would make a right mess in comparison. As you can see on the prices below, it was less than £20 for those. (UPDATE: dont go with the skinny bricks! I have changed the design now, see right at the bottom!)
Roof covering
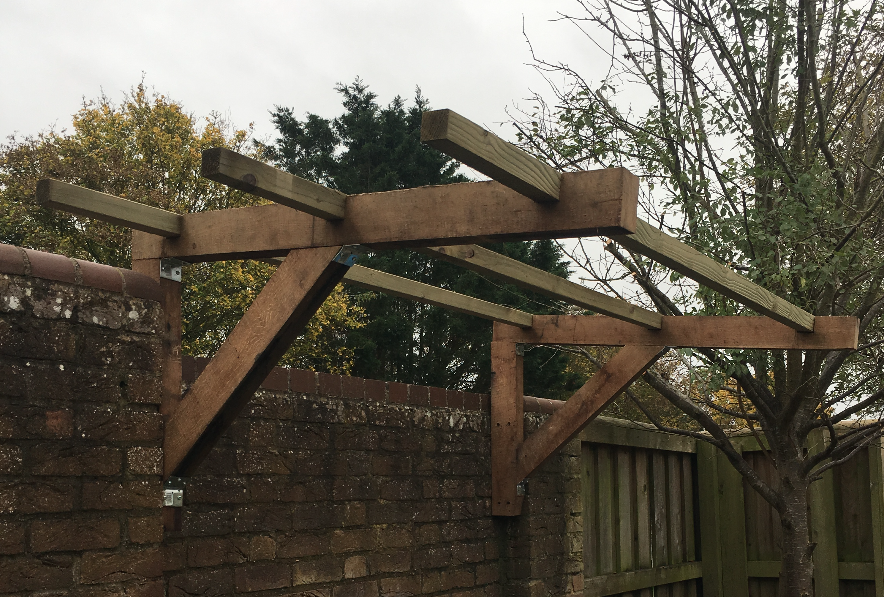
With 200 dry-as-a-bone bricks delivered we got two weeks of rain, which focused my attentions to the roof situation. The kiln will be outside, it’s so much easier with fumes and heat but rain isn’t ideal. I planned a single skin corrugated 0.7mm green painted galvanized sheet. The sheet will be 1.3 m long and i’ll need 3 pieces to make ~3m width. I have been gifted some reclaimed oak for the gallows (or similar) bracket.
Wow – exciting, corrugated roofing arrived today!!! This was about 4 weeks early and no notifications, good job I was in. I only needed 3 x 1.3m sheets and was pained to pay twice the value of the materials for delivery and it made it worse that an additional sheet was gifted to cover the 3 sheets underneath. Still, it’s here and it looks great quality, a lovely dark green and it means I can get on it at the weekend and make the kiln area a little drier.
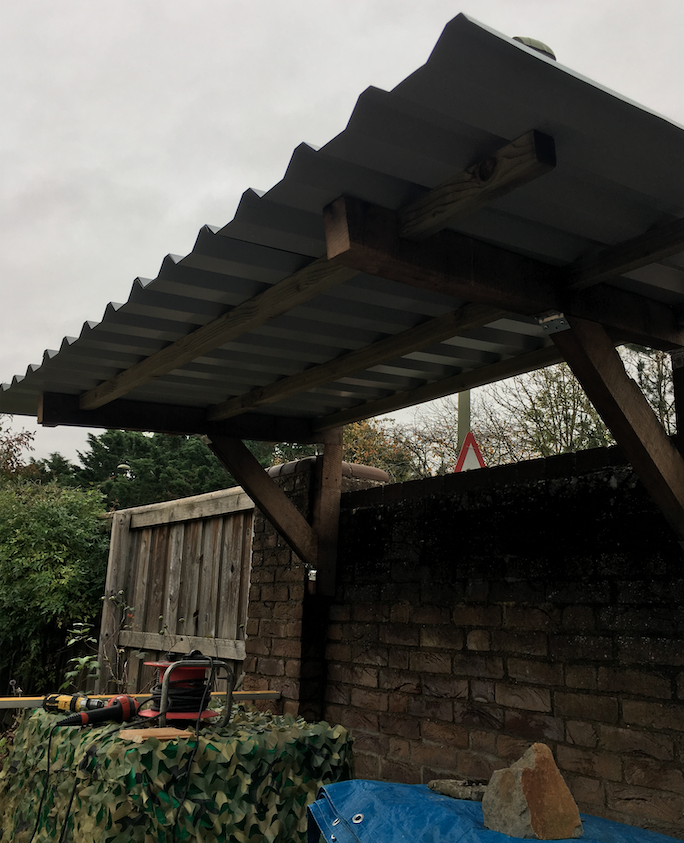
Roof done, it’s a good balance between keeping the rain off, access to the kiln and clearance for the gasses and flame.
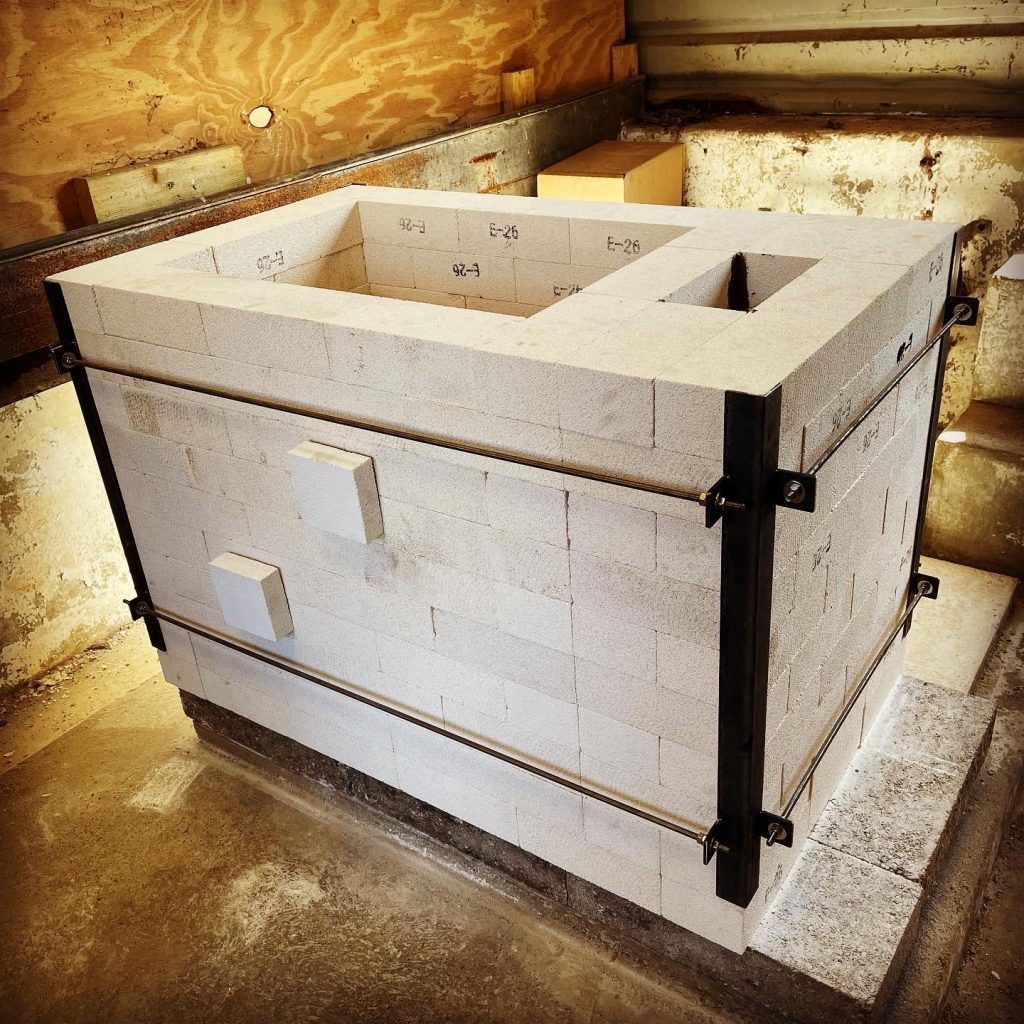
Steels
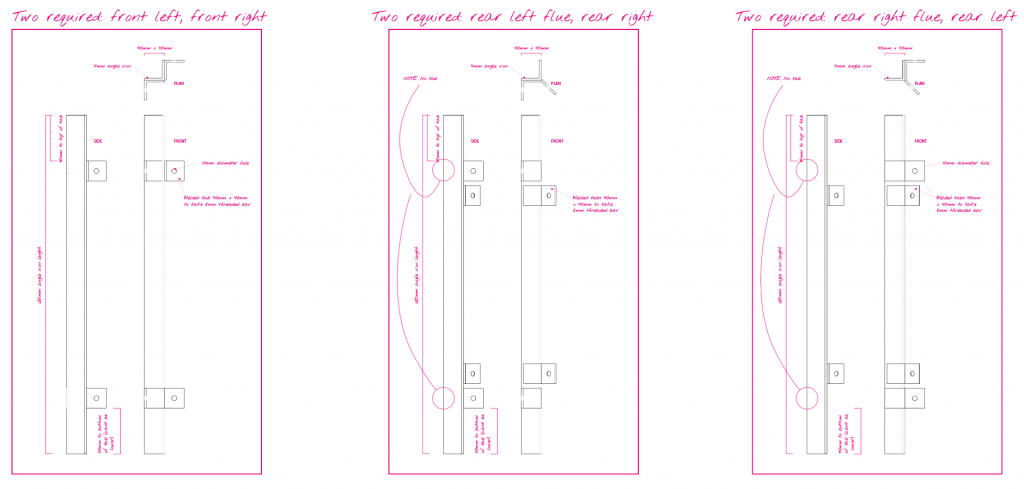
I’ve been thinking about the steel to clamp the kiln and know this is necessary really to reduce the gaps as well as to make it safer from knocking the bricks and the thing collapsing. I am torn between doing this myself and paying to get it done. It’s been a long time since I’ve done welding and I want it done neatly. I would have to rent equipment or get all the bits together and then take it somewhere for welding. I may still do one or the other but started drawing up plans to get the requirements together. This way I can get a quote and that will either force me to DIY or commission the steels.
The flue makes the steels a little more awkward, although once the build is done this problem goes away and i’ll be left with a great uninterrupted chamber, it will be worth it 100%.
Thinking about materials I would love the threaded bar (which connects the steels) in stainless, and on ebay price difference with mild steel seems reasonable. Mild steel bars will rust and the nuts/washers will stick and jam, it will drip RIO on the patio and I would rather it look trim for as long as possible, if I can go stainless I will.
Decision made, I’ve commissioned the steels. Plus £6.50 per m for stainless steel studding, I need 8 1m lengths. The angle iron and welding is £180 all in, should be ready for me to collect soon.
Studding was sourced from ebay – I went for stainless steel, all in with nuts and washers was around £45. I think the studding as mild steel was less than £20 so there could be saving if someone wanted to make that choice. The damp from outside does rust parts like these and the nuts get jammed, I want to keep this kiln going as long as possible and want to easily adjust and reuse things in the future so I think the extra is worth it.
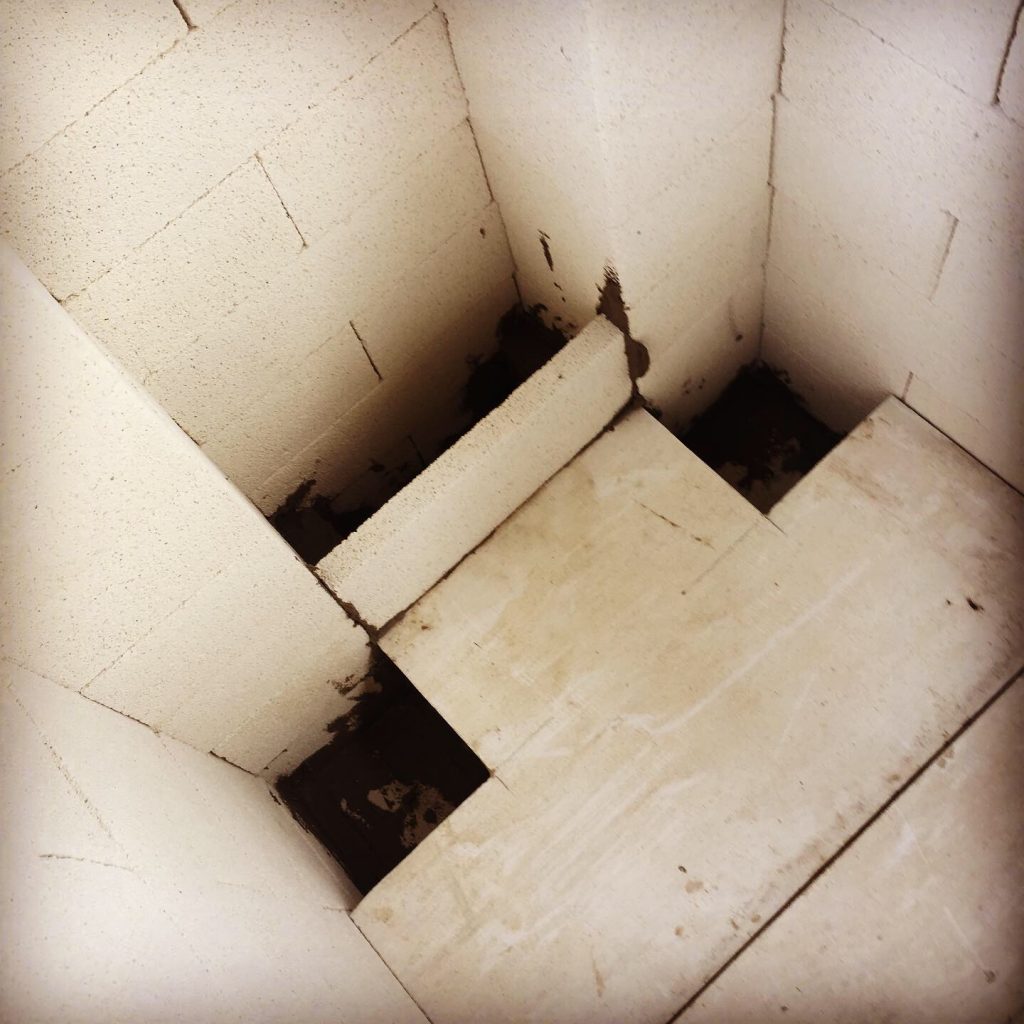
Now the roof is on it’s back to completing the kiln. I’ve made plans to chop the kiln shelves to form the floor of the kiln.
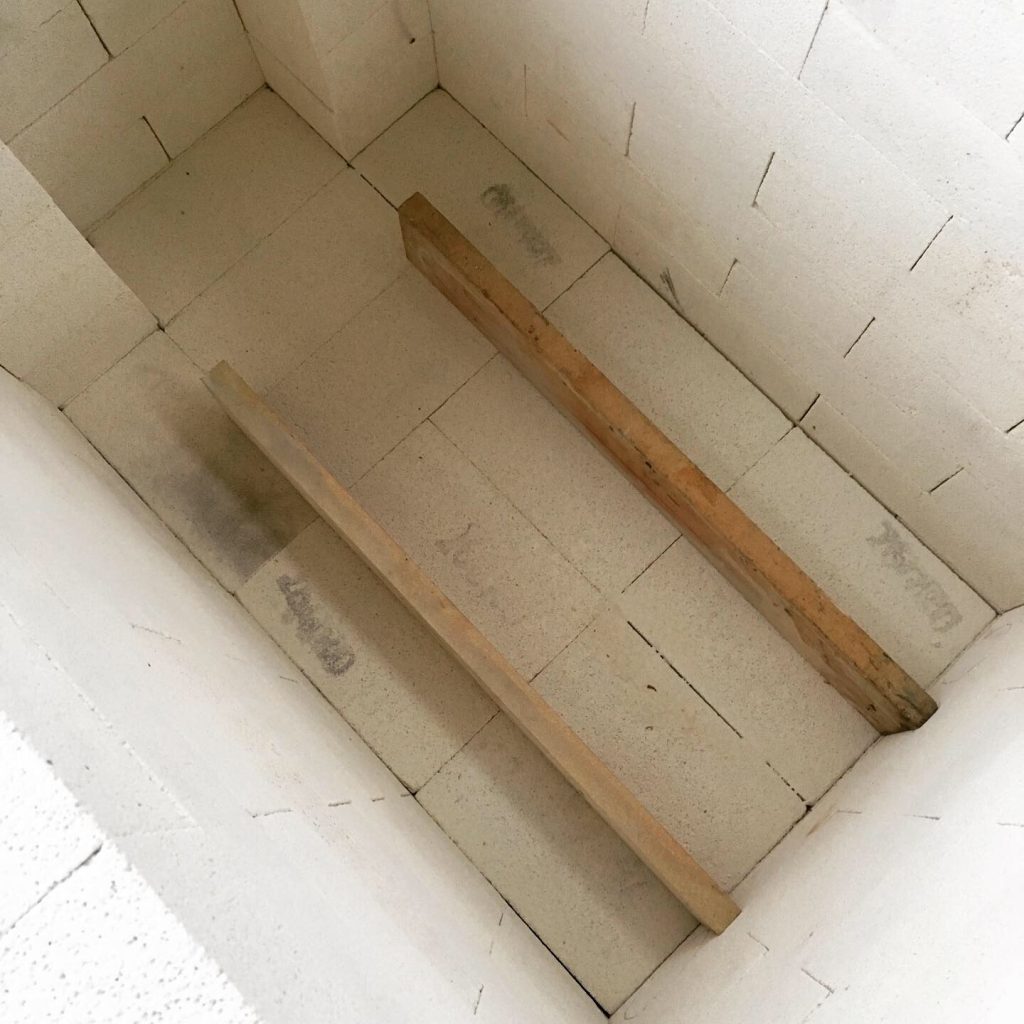
Shelves will sit on a 90mm high thin cut kiln shelf, this will run the whole length of the floor, still to do. Burner ports still to be cut in the photo above these come in middle right and bottom middle.
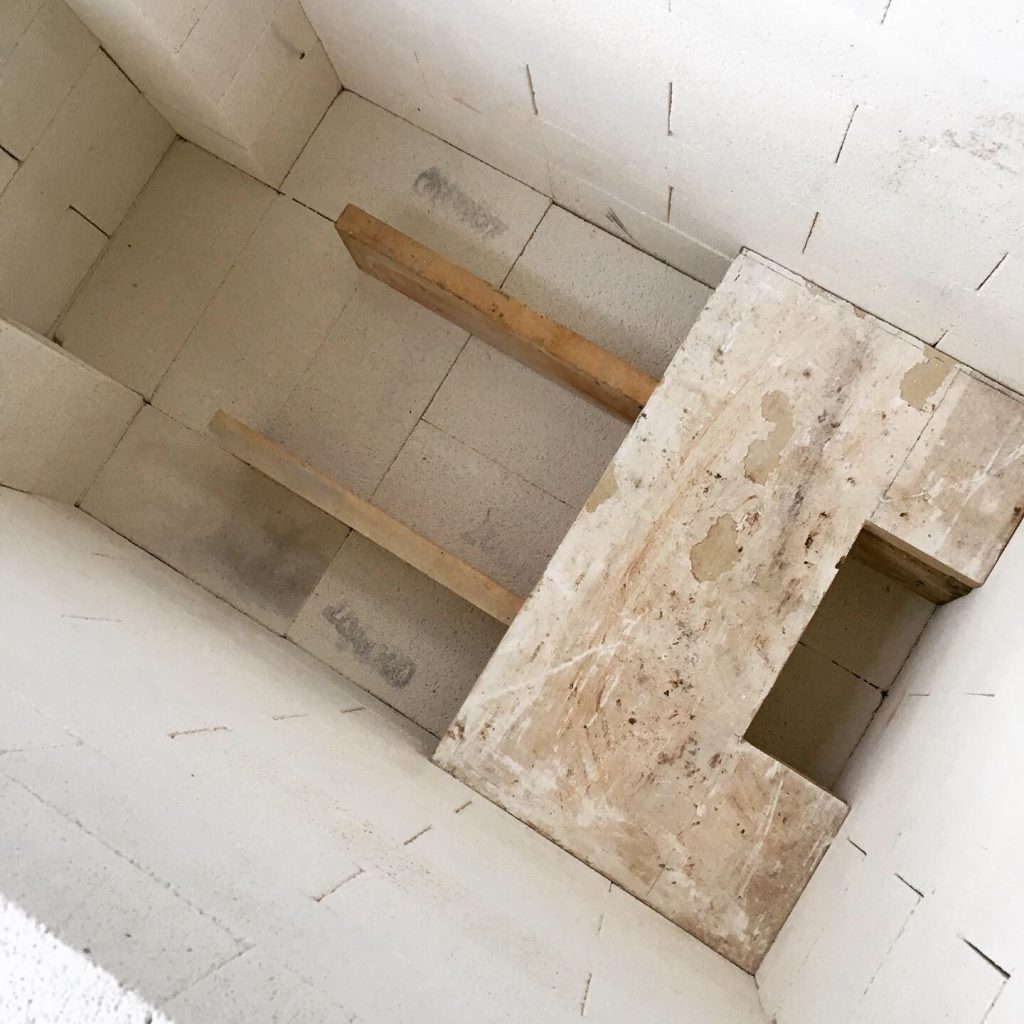
The cut-out of the shelf in the photo above allows the gasses inside the kiln to exit towards the chimney/flue. I have calculated a min 17 square inches for this area, this slot well exceeds this.
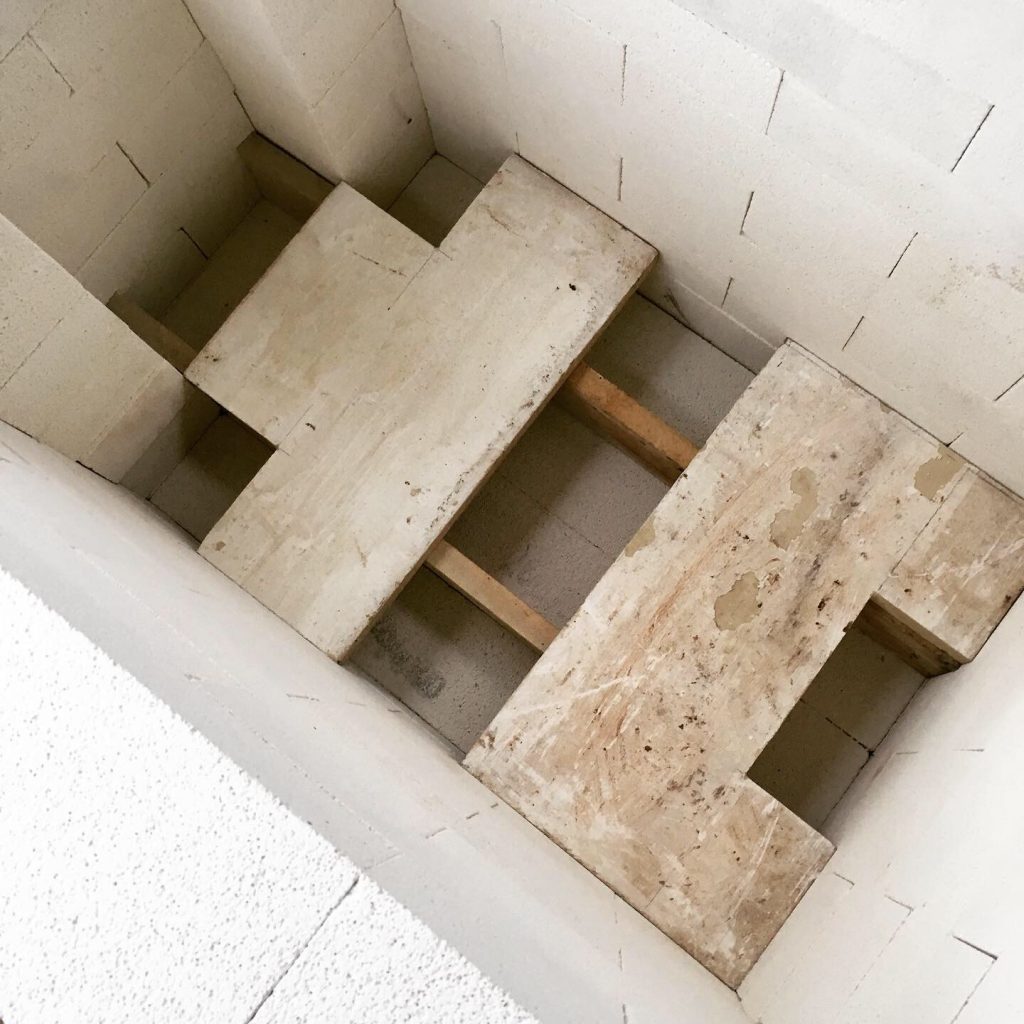
The shelf in the top of the picture has two 115mm squares cut, this allows the gasses to turn the corner and shoot up into the kiln chamber. There will be a 45 degree brick at the end of the channel to aid the direction. Don’t be distracted by the flue at the end not having the thin bricks facing the kiln chamber filled in. Those are on the to do list and were waiting for the steels and studding that I collected at the end of last week. I was thinking that the kiln all needs to be tightened up at the time the flue is completed crushing it all into place. The flue will have cement to secure the bricks and I want to tighten it all up as it dries.
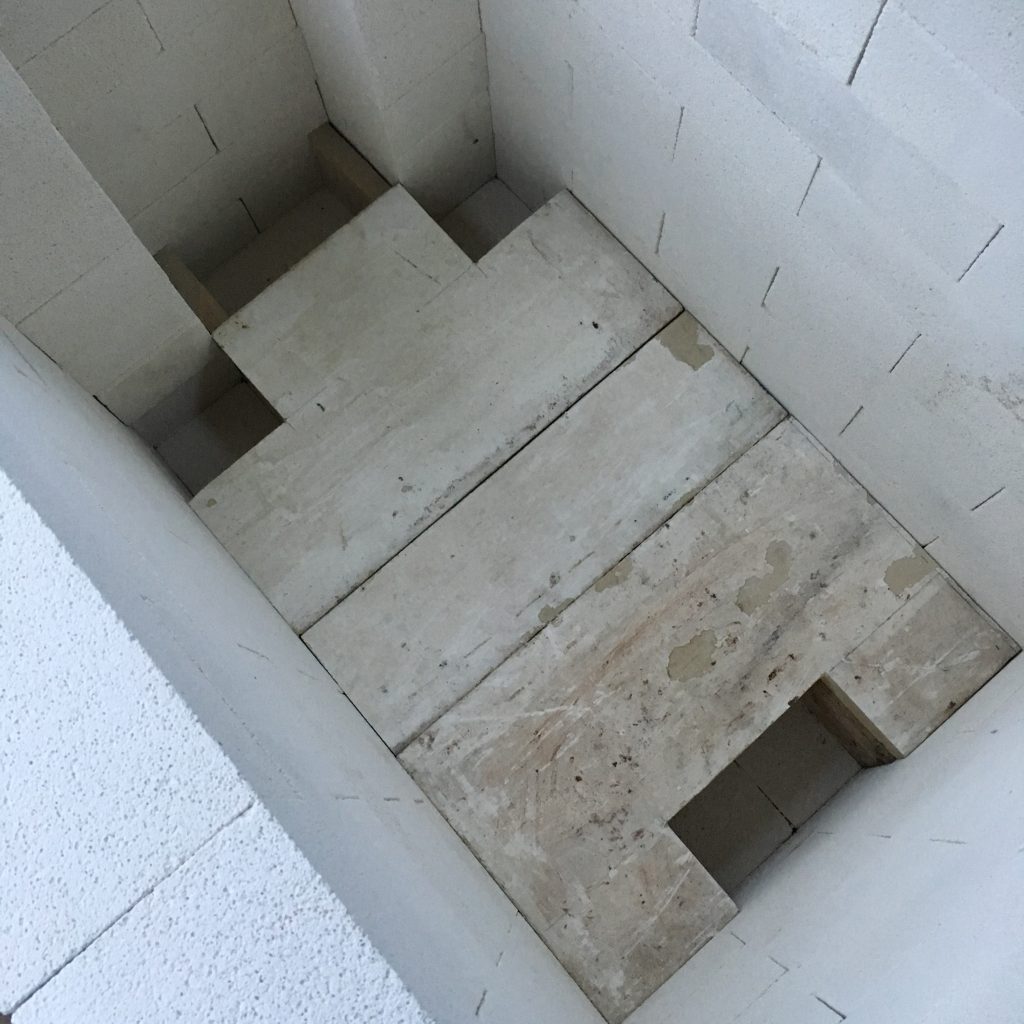
So that’s the floor in and done, it’s used three of the nine 2nd hand shelves that I brought so plenty for the stacks. I need to remove them now, batt wash them, build the flue, drill the burner ports vacuum the alumina dust like crazy and reseat them. I’ll probably cement any larger gaps in the floor and cement the shelves to the thin upright shelf in an effort to create a reasonable seal.
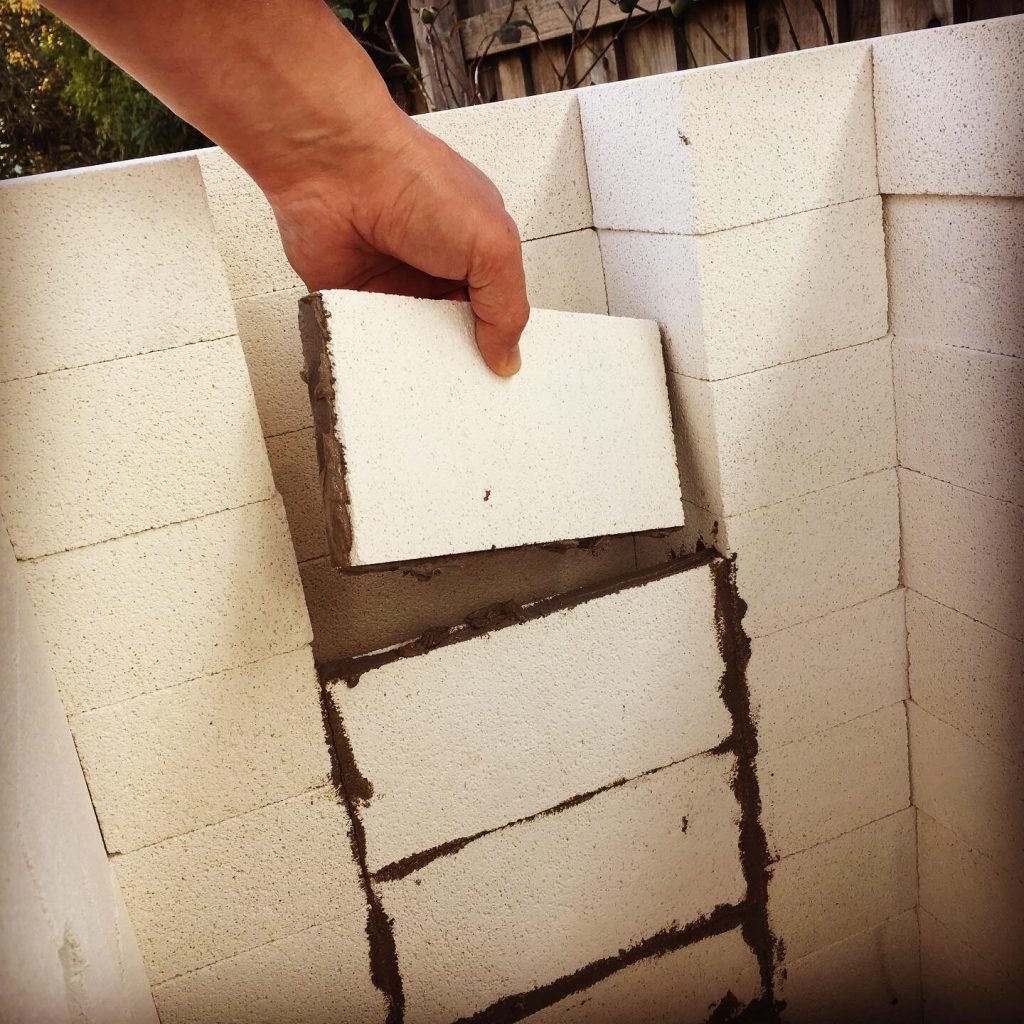
Update: This skinny brick is not ideal, I have since changed the design to avoid this narrow ledge.
Flue is cemented in now and I used cement on the floor too. I wasn’t certain that I should have cemented the floor just in case I need to remove everything again but felt like sealing it from the gasses would be ideal and that it would be possible to take everything apart if I really needed to and make good any damage. Anyway, decision made.
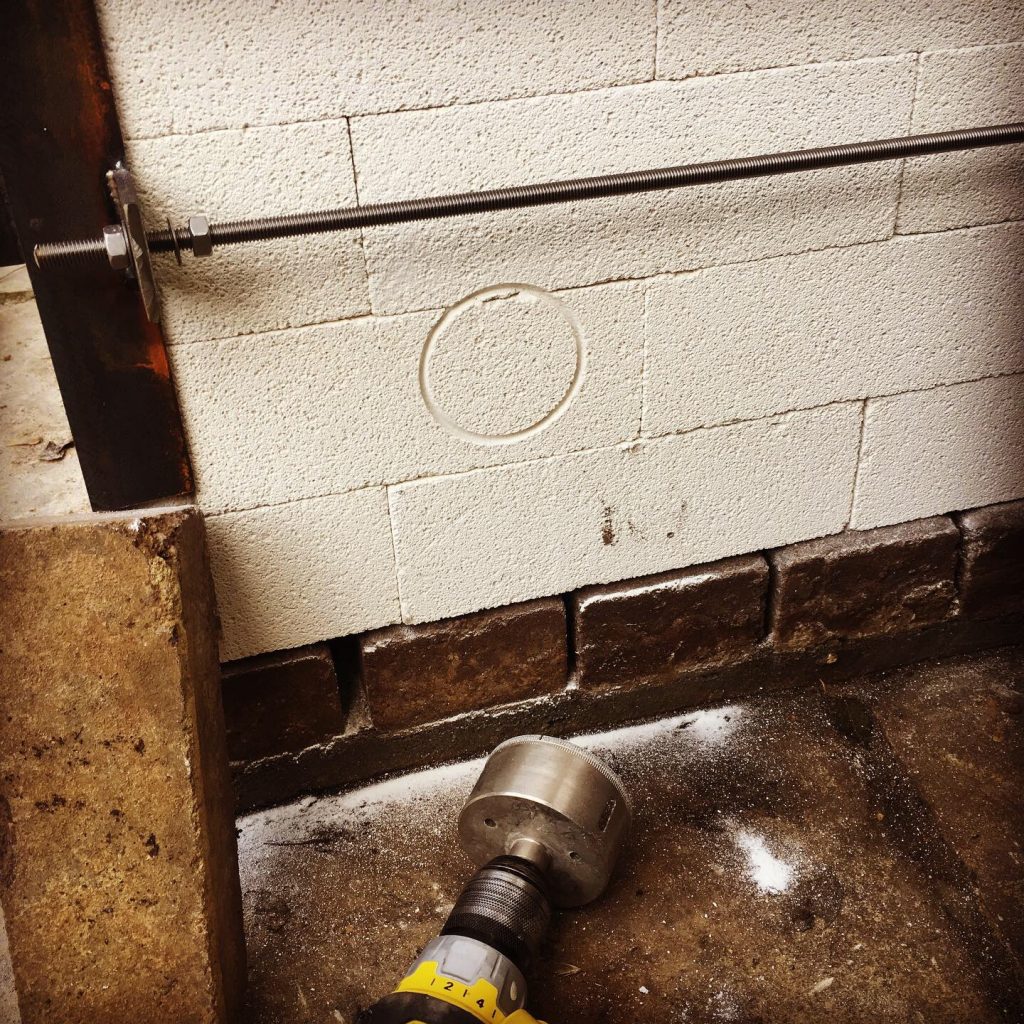
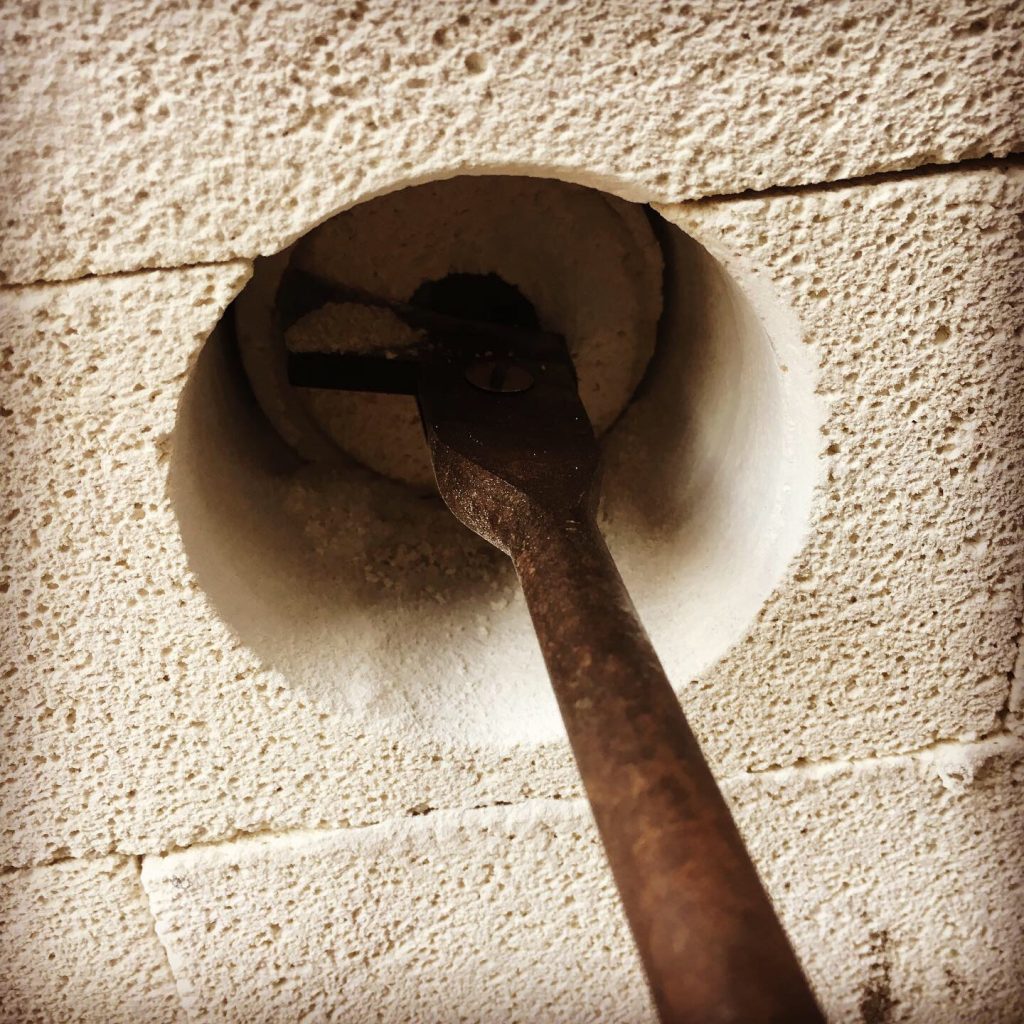
The steels clear the burner ports well and I use a combination of a core drill and an old auger tool to make neat holes. These are about 90mm.
Spy holes
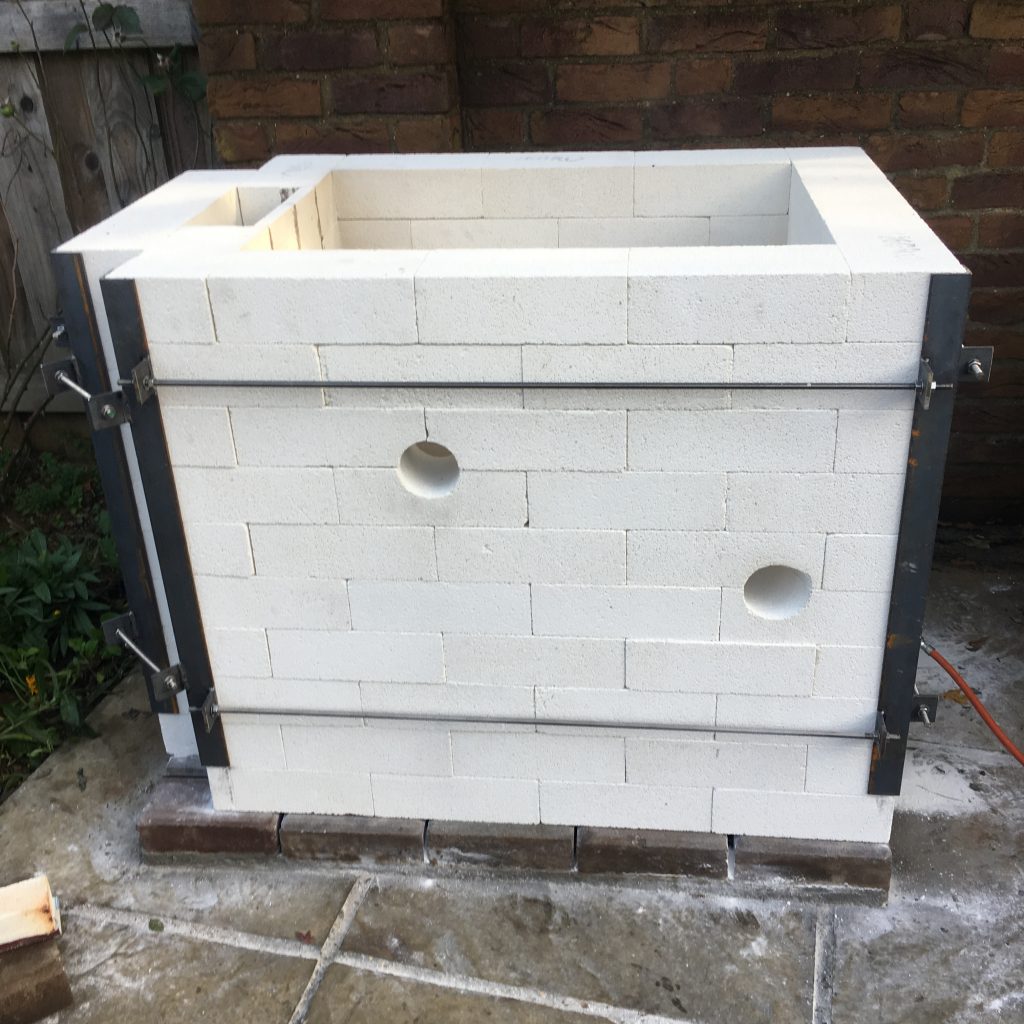
Spy holes drilled to the front, the one middle right is at an angle and enables a view to the floor and toward the middle of the chamber, it is at the back of the chamber and I am hoping far enough away from flames for the best view. The one top left is set back from the flame path at the front and top but can look towards the top and front. I tried to keep the holes from being too close to the edges of bricks to enable them to retain their strength.
All the steels are nipped up and tight now. The structure is now rigid and secure.
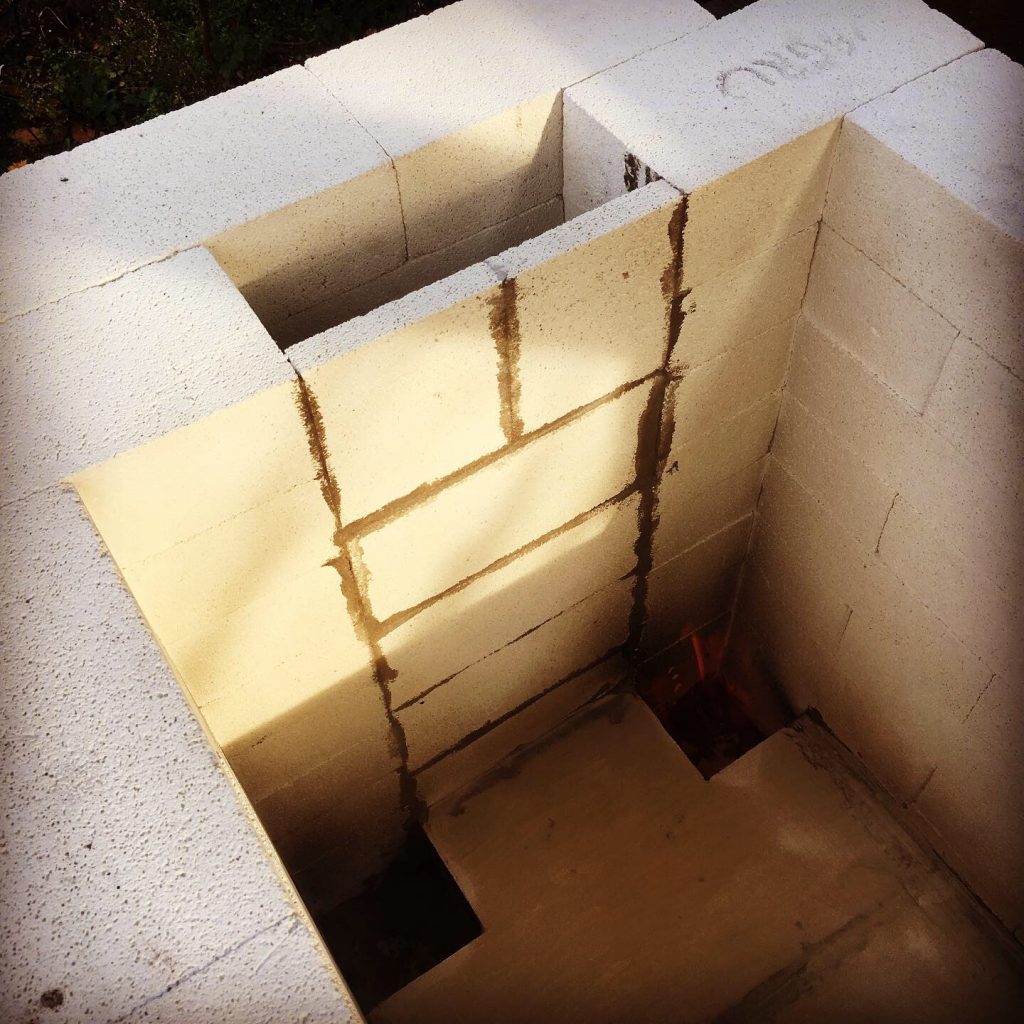
I used a small burner to dry the inside a little from the batt wash and cement. Initially the flames were all over the place and very little draw. On heating the channel under the floor that leads to the flue a really good draw was created and afterwards sucked the flames towards it, that was a really good moment, it’s going to work.
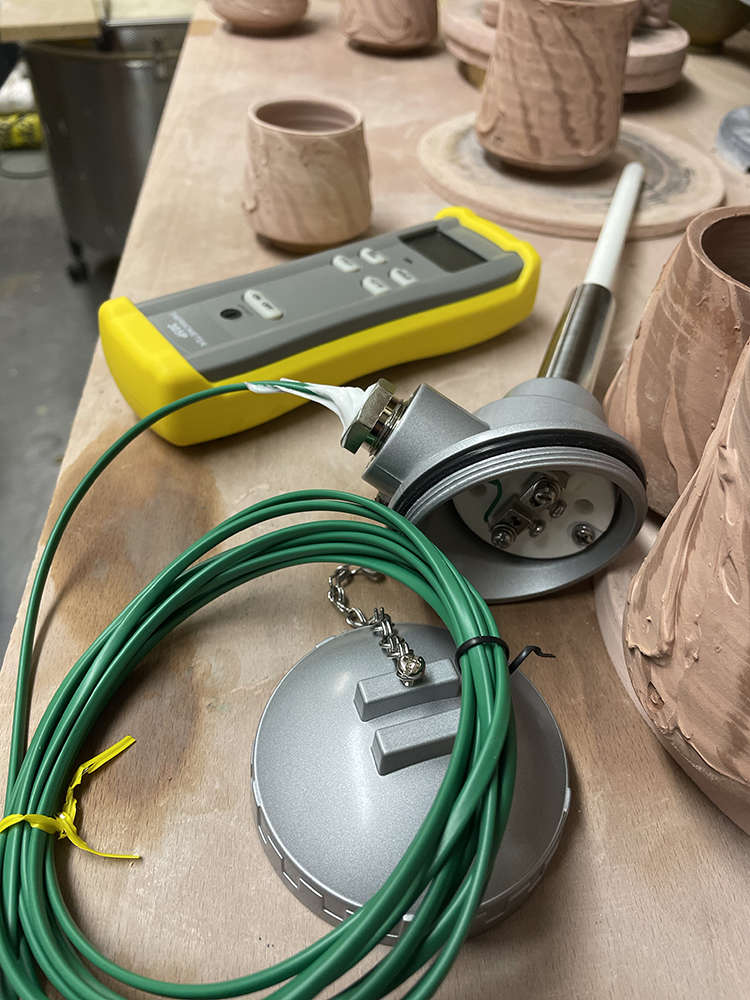
Last firing with my old thermocouple and pyro wasn’t good. It had been playing up ever since I owned it really and just accepted that some firings I would be a little blind. Good for experience building, terrible for planning and precision! Plus when I was trying something new out and wanting the benefit of an accurate reading it was a little bit hit and miss really. I looked for 2nd hand but couldn’t find what I wanted, I also had a fair bit of conflicting advice about what to get S type or K type etc. I went K type in the end as I am not planning on going much hotter than 1280 and the K type is rated to 1350 centigrade. The S type is rated to 1600 centigrade so no need for me to get that one, it’s loads more money too. https://www.tcdirect.co.uk/ were super helpful and I got everything I needed from them. I was a little surprised that nothing comes wired and you need to buy the wire (minimum is 25M!) and the mini plugs for the connection. Also the wire you need to get ideally needs to be matched to the thermocouple. The thermocouple is enormous, it looks like something that dropped off a space craft
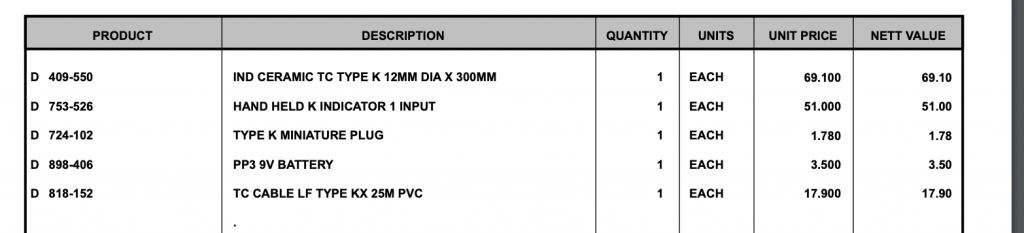
£186 in total for temperature sensing. I have it all wired together now, pretty easy – green is positive white is negative, it’s great the there is a low temp sensing mode and somewhat reassuring that it can measure room temp and well as 1350 centigrade, my old one was ‘out of range’ anything below 200 centigrade. Note the white silicone to weatherproof the wire into the housing – the rubber bung was way to big for the wire and I don’t want water getting in.
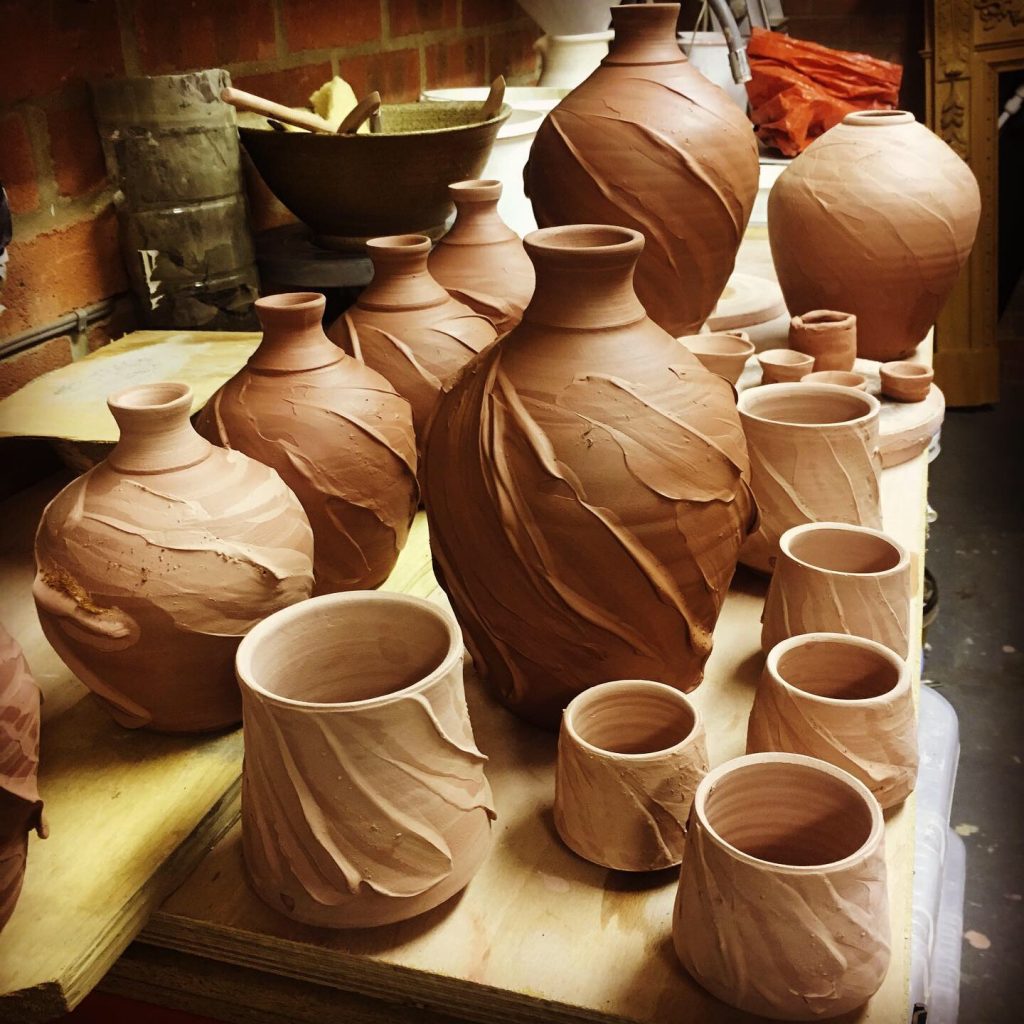
So the last jobs to do are to make the spy hole plugs and the 45 degree gas deflector blocks, drill a hole for the thermocouple and that’s about it. I have thrown a few for first firing…
If you want my plans you are welcome, see drawings below, these aren’t 100% accurate but will give you a good idea together with the photos for what you could do. In total the build was approx £1,200 for this custom 7 cubic foot downdraft kiln. Please do let me know if you use some/any of the info/plans I would love to know I’ve helped, plus please follow me on Insta on https://www.instagram.com/shieldstudiopottery/
Modifications after a few firings:
Having fired the kiln a few times now there are some adjustments I would recommend and have since built another with adjustments which work better: The thin brick between the flue and the kiln, it’s simply too thin for the ceiling bricks to rest on as well as damper bricks for the flue, the thin nature of the brick also means it’s red hot and there’s some degree of heat loss into the flue. This is simply resolved through a full width brick instead and means that the kiln is 214 mm longer and can of course be rectangular rather than having a return. See the next two photos of another kiln I built with this change. It’s all together simpler being rectangular, less steels and no complicated angles and better insulation around the business end of the flue.
Note in the photo below the ceiling bricks are clamped together. Previously I wasn’t going to do this as it would be heavy to lift off although it’s safer. Cracks do/will appear in the ceiling bricks and clamping them will avoid a collapse.